How To Dismantle Panasonic Aircon?
November 15, 2019
What You Need to Be Aware of before you Purchase an Air Conditioning Unit
November 15, 2019How To Do A Chemical Overhaul For Mitsubishi Aircon Units

Due to Singapore’s year-round humidity and high outdoor temperatures, aircon units are necessary to keep you and your family cool and comfortable during the day and at night. An aircon unit can also help keep mold and mildew and other things dangerous to your health out of your home. For the best results, get your aircon unit professionally overhauled at least every 3 months, and keep the unit free of dust and debris build up between overhauls. If your Mitsubishi Aircon does not seem as cold as has it is in the past, or is running more frequently than usual despite outdoor temperatures remaining relatively the same, then your air conditioner may just be dirty, and needs a simple cleaning, or more than likely it is ready for a chemical overhaul. A simple clean is easy to do, and we will explain how to do this within this article, however it is only a temporary solution in most cases. Sometimes it will not fix the problems your aircon is having at all, and a complete chemical overhaul will be needed. A professional best does this, however it is possible that you can try the process yourself if you have some basic knowledge of how to use the tools needed.
Tools needed to overhaul your Mitsubishi Aircon:
· Tools for properly checking and recording temperature and air velocity
· Screwdrivers that specifically will work on your aircon unit
· Appliance cleaners with disinfectant
· Catch-bag that will properly hang underneath your aircon unit
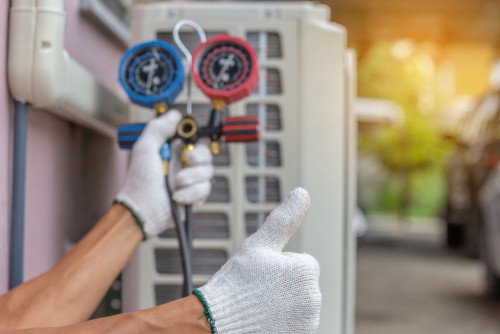
· Refrigerant and proper hosing
· Chemical cleaner for properly flushing the aircon unit’s piping
· Water sprayer with enough power to flush out all dirt and cleaner from the unit
· Compressed air to remove dirt and debris from areas that cannot be cleaned with water
To completely overhaul your Mitsubishi Aircon follow the steps described below. If you are only looking to do a simple cleaning, which is great to do between chemical overhauls as a maintenance cleaning, follow just the first eight steps.
Steps to overhaul your Mitsubishi Aircon:
– First
test your air conditioners output. Make sure it is running quietly, and is actually blowing cold air. Check the temperature and air velocity. Good tools can be rented if you do not have the proper tools to check the temperature and air velocity. Do no rely on feeling or a room temperature gauge alone. Record the temperatures of the output of your aircon to compare to temperatures after its been cleaned.
– Second
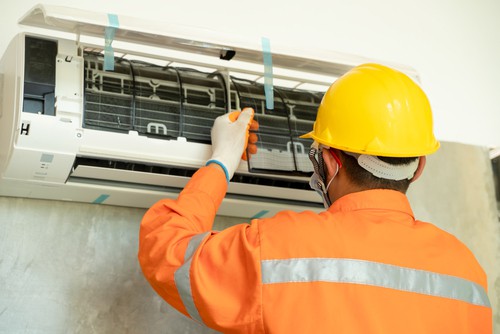
turn of the power with the main breaker that connects to your aircon unit (or, if it is possible, simply unplug the unit from the electrical source). Then, carefully remove the outer cover from your aircon. This will generally take a simple screwdriver, or some covers can easily be removed without.
– Third
clean the cover and filters. In order from your aircon to run properly you will want to wash and disinfect these with a proper detergent. Many stores where appliances are sold sell cleaners that will not harm your aircon but will effectively clean and disinfect it.
– Fourth
hang a catch-bag underneath the aircon unit. This will prevent damage to your wall or flooring, and is safer for proper cleanup and disposal.
– Fifth
apply cleaner to the coil and drain. Use a water machine with a sprayer to push the water in and around the coil. Be sure to flush all the water and cleaner out of the drain.
– Sixth
clean the fan of your aircon. This may require you to remove the fan to properly clean it. Use the same cleaner you used on the coil and drain, and be sure to flush all the water out and allow it to properly dry before using it again. When spraying cleaner or water into your aircon unit, be sure not to get any electrical components (such as wiring) wet.
– Seventh
use a compressed air blower to remove any additional dust from the electrical components or other areas inside your aircon. These should not be cleaned with cleaner and water or you may ruin your aircon beyond repair.
– Eighth
if you are just doing a simple cleaning (or maintenance cleaning) to your aircon, then you are finished. Just let your aircon unit dry completely, and then replace the cover. Retest your aircon unit’s temperature and output velocity to determine if a simple cleaning improved your aircon unit. If not, then continue on to the next steps for a complete chemical overhaul, or contact a professional to perform this service using their expertise and knowledge.
– Ninth
read in your instruction manual on how to properly check and add refrigerant to the aircon unit. This step can be different for each unit, so you need to properly see how to do it for your unit. Before adding refrigerant, test the amount that already exists. 25 psi is ideal, any more can be harmful to your unit, and if there is less than 25 than you need to add more. Attach the proper hosing to your unit. Again, refer to the manufacturer’s instruction manual on how to properly do this. While refilling, check for any leaks and clean out any dust you see. If there are leaks you will need to order new parts for your aircon unit and install them before using it.
– Tenth
detach the hose from your unit, and properly recap the refrigerant holding. Next, you need to flush the piping within the system to ensure proper chemical and airflow. Again, your instruction manual should instruct you on how to properly do this for your specific unit.
– Eleventh
let your aircon unit properly dry then replace all parts you took off before reconnecting the unit to a power source. Finally, retest the air temperature and velocity of your aircon again, comparing these results to your initial recordings taken in the first step.
After a complete chemical overhaul of your aircon unit, your aircon should be working properly and efficiently. If something still seems to not be working properly, contact a professional cleaning and repair service. There may be an electrical issue, a part inside the unit you could not service yourself may be broken, or you may have improperly used the chemical cleaners or refrigerant in your unit.